Social Media has taken over our society these days! Everything from Facebook —-> Stumbleupon —-> Pinterest —-> Hometalk —-> Twitter! I know I left off countless media avenues, but I think I would be listing them for days if I included everyone, and this is not the purpose, or the reason for this post today. =)
Today is all about DIY Design work! Specifically speaking…. the blogging kind of design. Do you have your own blog, and are trying to figure out how you can save hundreds of dollars to design your own blog ‘home’? If not……are you currently wondering how when you click on that cute little button on websites, it actually brings you to the another link or site? Stay with me……I am going to show you how……..
In my year and a half of blogging, I have been trying to figure out how to “dress” up my site, which means I have spent countless hours googling. Hours that I should have spent picking up, cleaning or doing the laundry…..but hey, as long as no one drops by my house unannounced….we are good!
In that time, I have learned a lot, and since we are all friends……why shouldn’t I share what I am learning. I know that you would do the same for me, and if you are so inclined to return the favor…..I have a pile of laundry that needs to be ironed. LOL! Just kidding…….kind of!
Step 1:
Let’s get it going……. you all know my fascination and love affair with Picmonkey! I have been using it for everything! Get a glimpse by going here, here and here. I still use the free Picmonkey, but I am so missing the Brush Tip font, that I may have to upgrade soon. If I do upgrade, I will let you know how I like it!!
I have created a few different social media icons since the start of Tempting Thyme, but today we are going to focus on creating the banner style icons.
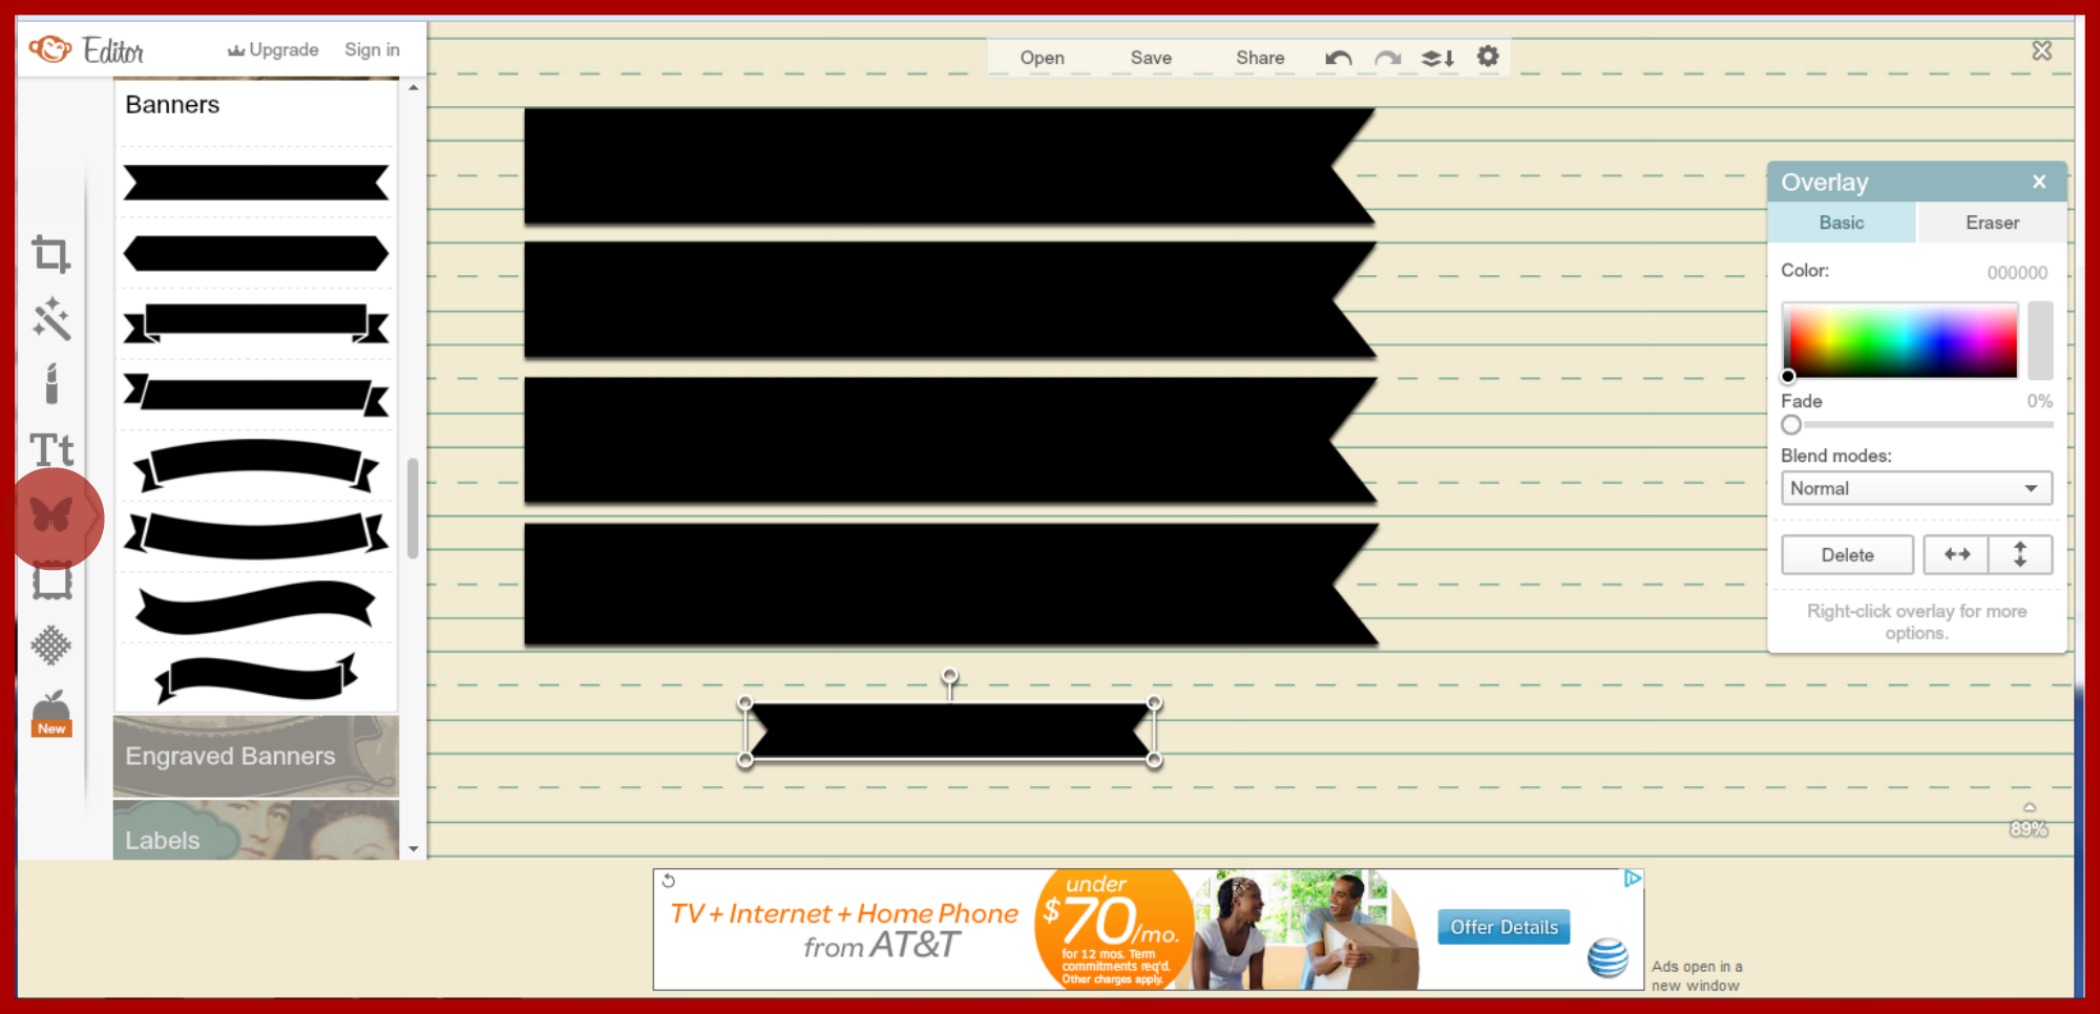
So, first things first…..bear with me on the screenshots that I have taken of each step. I haven’t quite figured out how to make the quality better, end result being it is a little grainy. Bring up Picmonkey’s website and click on ‘Edit a Photo’. Remember that transparent image that you saved onto your computer when I showed you how to make your own personal watermark? Upload it now!
**If you don’t have this transparent image saved to your computer, or you don’t remember that post, please click here, and you can quickly get it done before continuing**
As this is a transparent image, you are not going to see anything at first. Which means you won’t see any borders or edges. We will fix this with the very first ‘banner’. On the left hand side of Picmonkey, you will see all of the various icons to choose from. We want to choose the overlay icon, which is the cute little butterfly that I have highlighted with a red circle. Once you have clicked on it, scroll down and choose the Banner category, as seen above. For mine, I chose the first banner and then moved it around so that only one side of the edge would show. To move and enlarge the banner, just click and drag the corner ‘edges’ of the highlighted banner. Make this first banner as long as necessary to hit the edge of your transparent photo. At this point it doesn’t matter how big the area is, as we will resize it when it is all said and done. I needed 5 banners and I had to do some finagling towards the end to get them all to be the same size and to fit into the designated space.
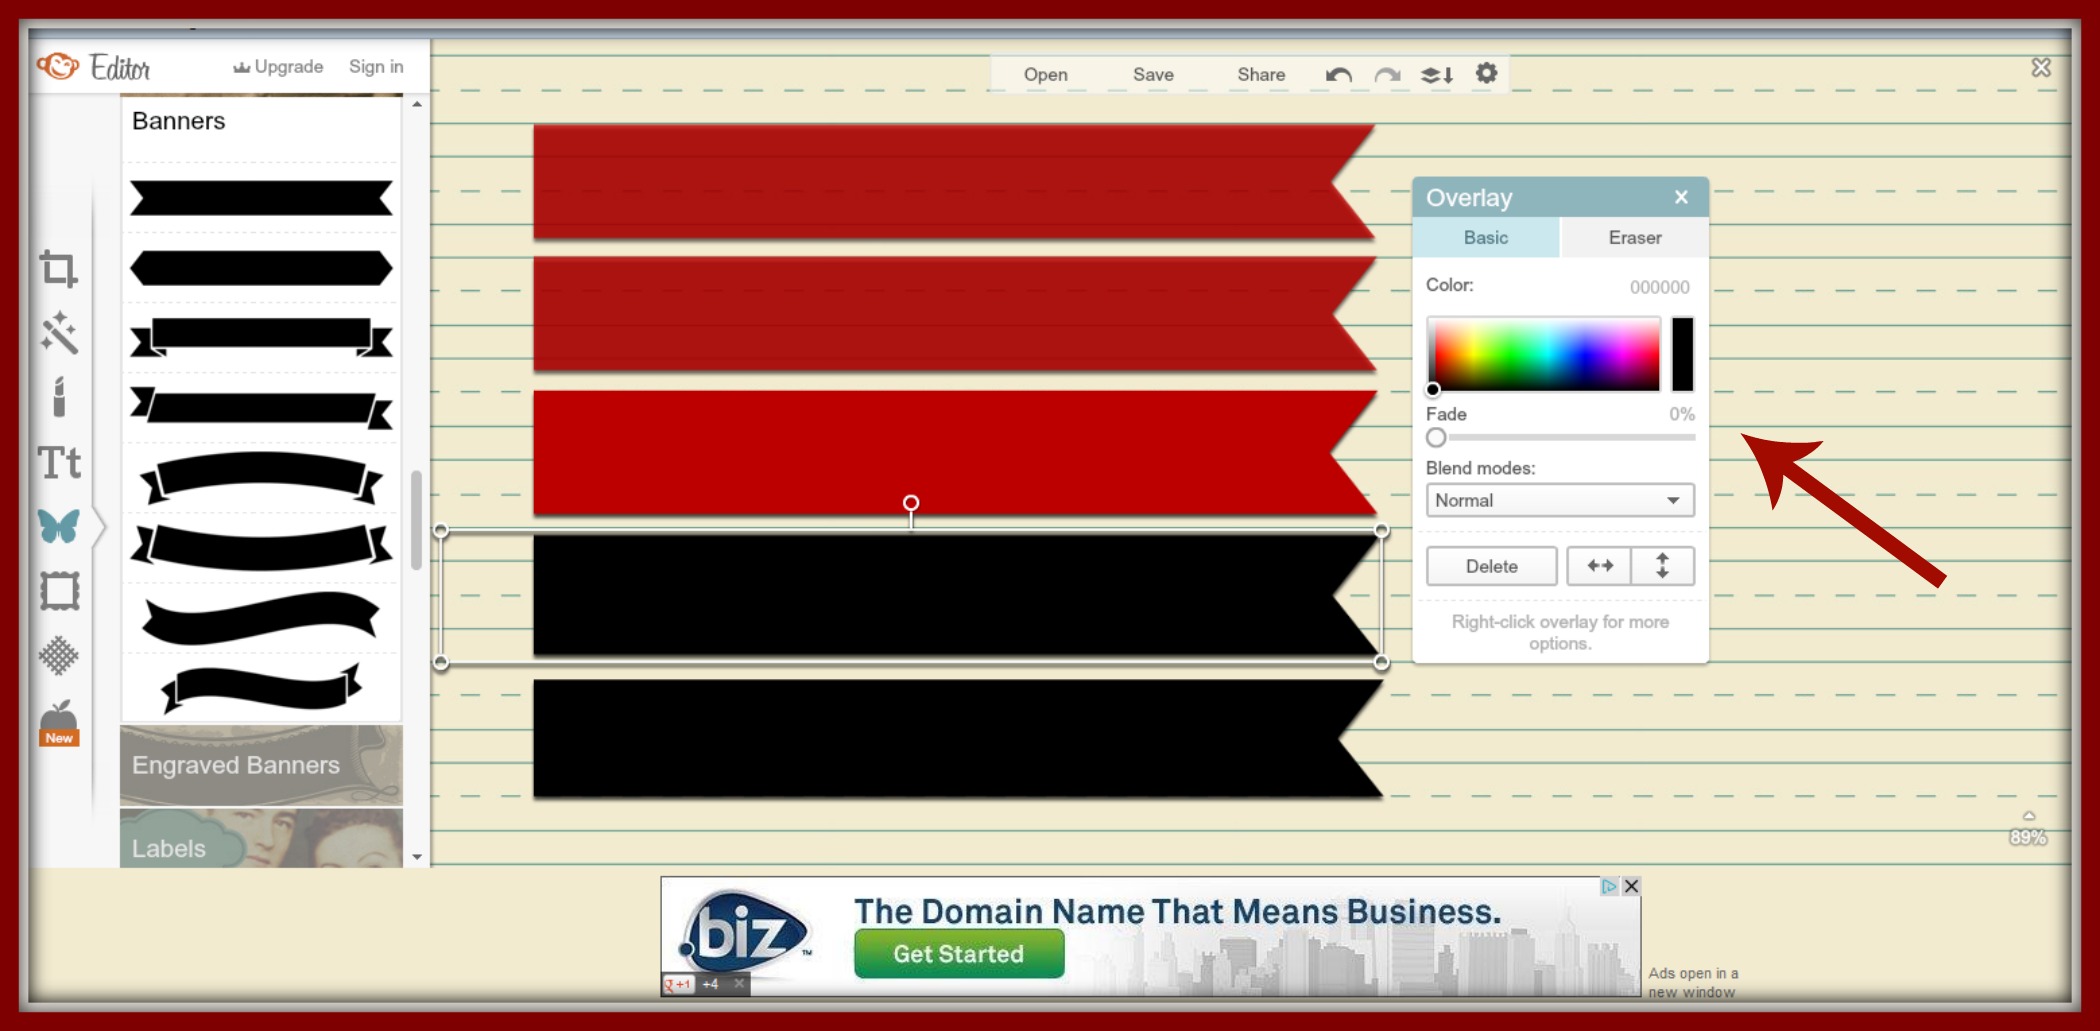
Once I had the 5 banners completed, I started to play around with the color. In the overlay box you can play around and click on the color of you choice. To have the banner saturated with the designated color, you will need to click on it and then click the color of your choice. Two step process each and every time! Now, if you are like me you will never choose the same shade of red twice. There is a very cool feature that I found by accident. Once you find the shade that you like, write down that 6 digit number to the right of the word color. It is under the ‘Eraser’. If you highlight this area and type in that chosen 6 digit number, you will have each and every banner the same color. Remember, you will need to do this step for each one.
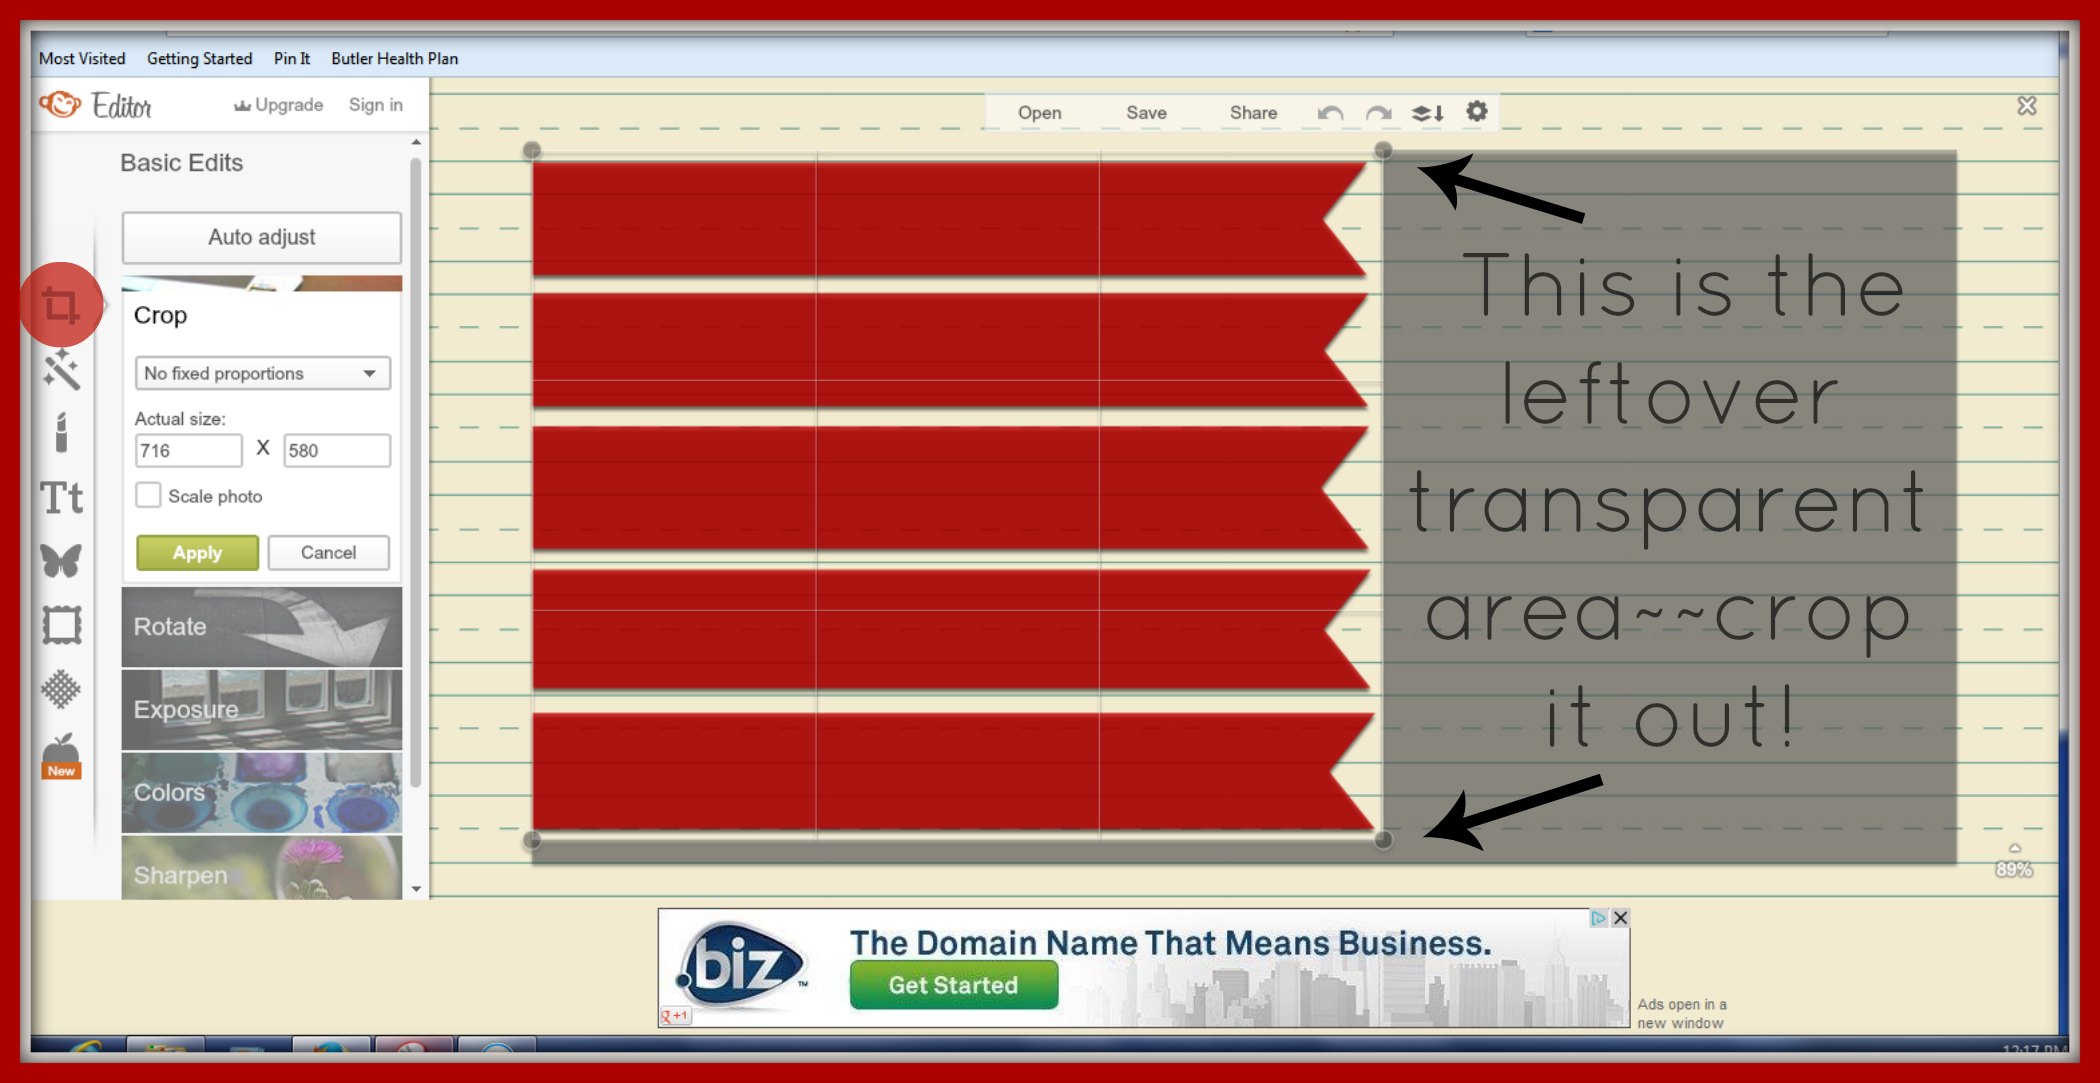
Once all the banners are done, you will crop and resize if necessary. As I wanted 5 banners, I wasn’t able to use the entire width of my original transparent photo. This was an easy fix by cropping that area out. If you need to do this go to the Edit icon, which is the first one on the top left. Click on it and it will bring the cropping tool onto you banner photo. Drag the corners down to the area that you need. In mine you will see that I cropped out quite a bit of the leftover grey (transparent) area.
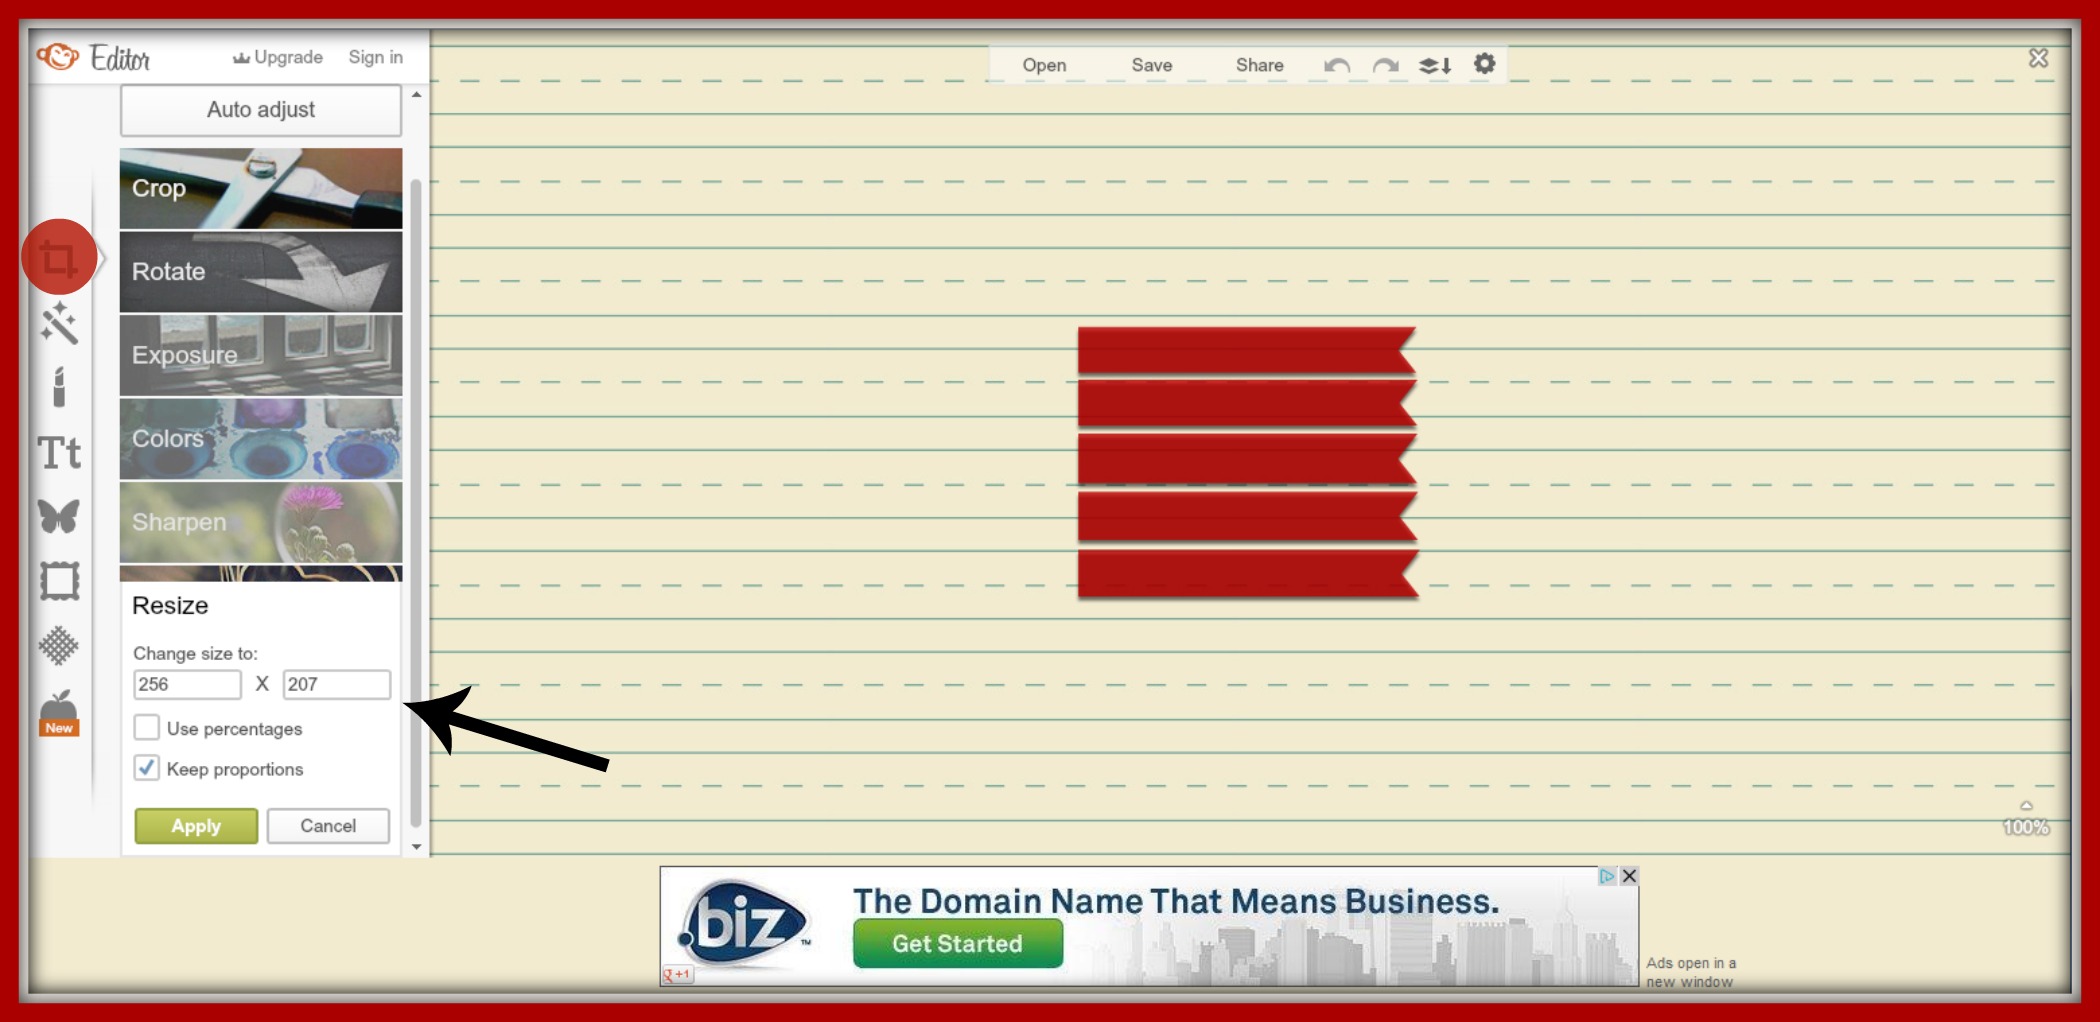
Once the extra is cropped out, you will click on the ‘resizing’ tool at the bottom. You don’t need to go to a different icon, it is still part of ‘Edit’. This is where you will need to know the dimensions allowed on your sidebar theme. I happen to use the WordPress platform, and each theme allows different dimensions. I wanted to keep the proportions (didn’t want any distortion), so as soon as I plugged in my width of 256 it automatically changed the height for me. Once you have your appropriate dimensions, hit the ‘Apply’ button.
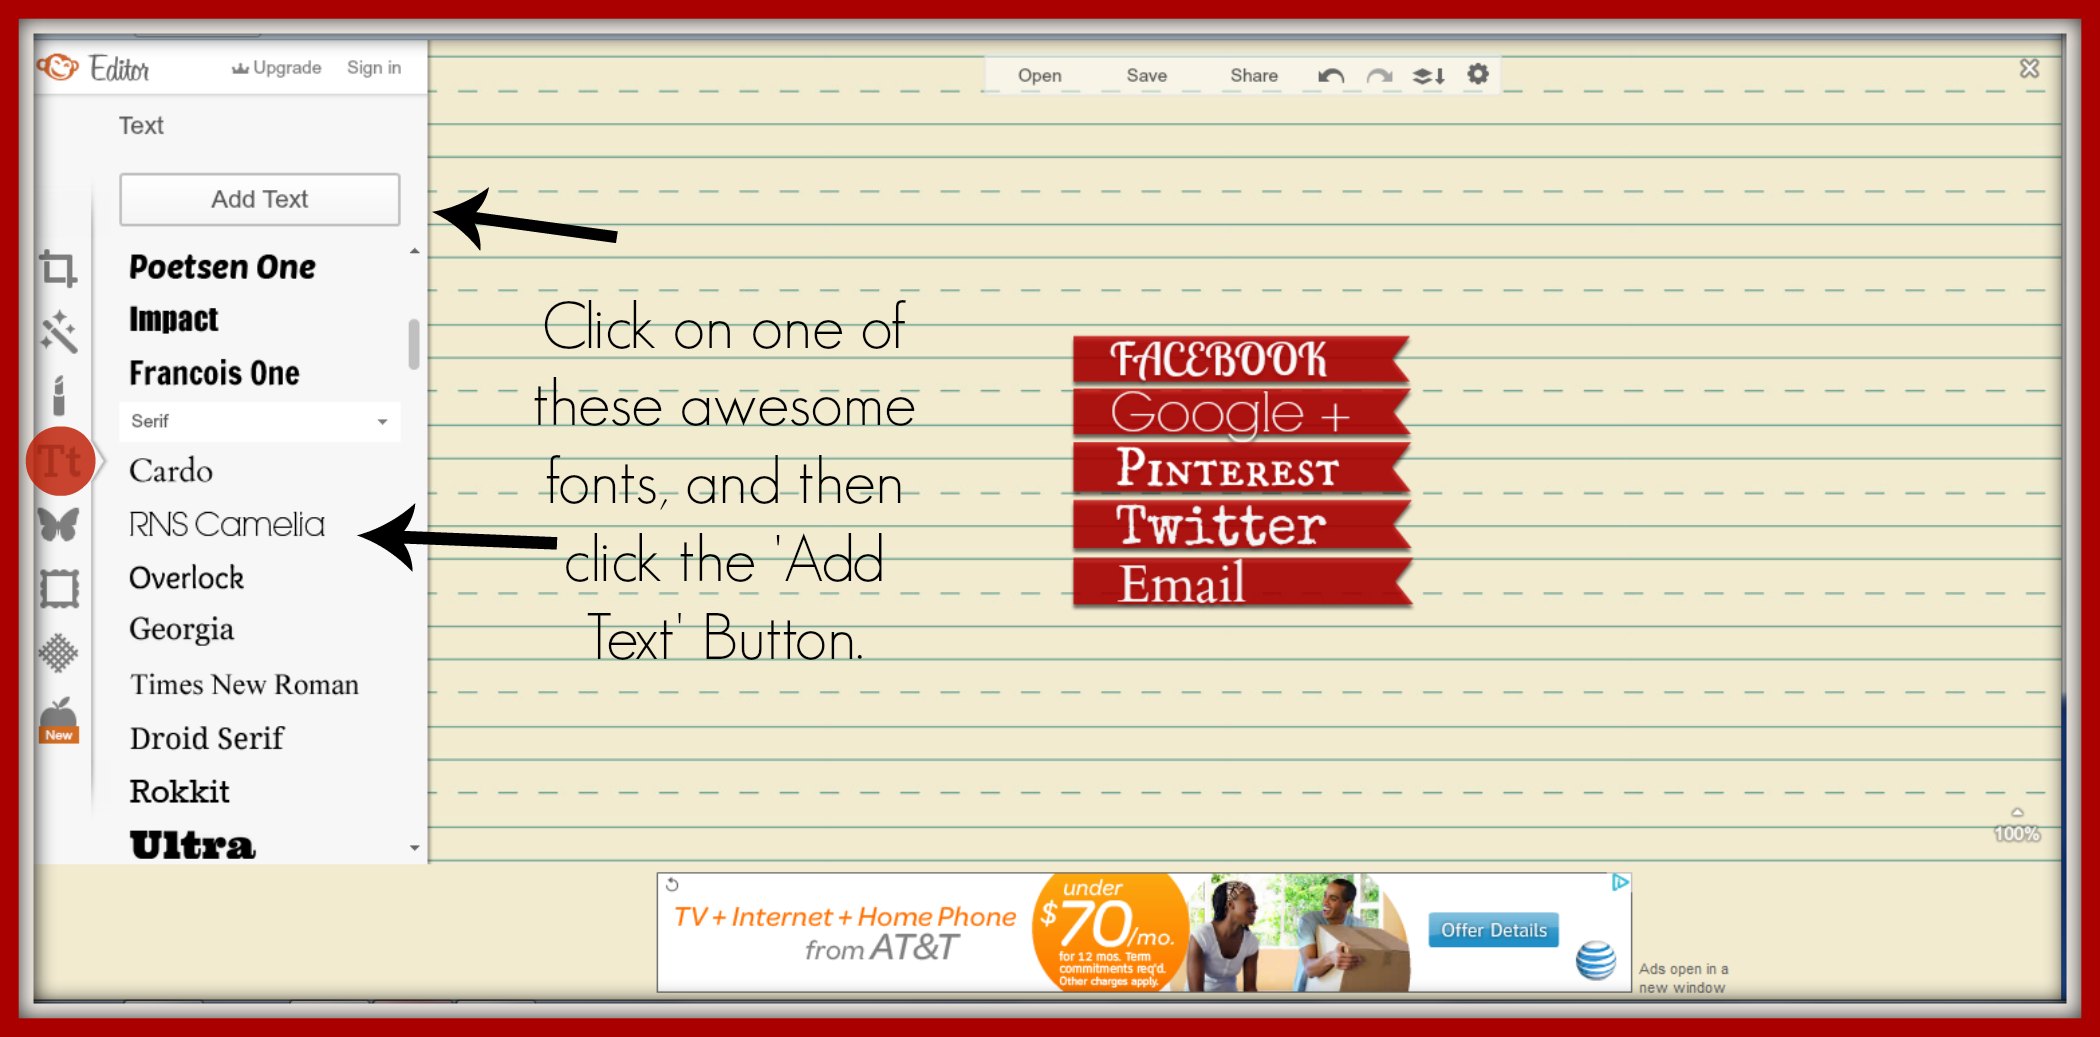
Now it is time to choose the font that you want to use. I played around with 5 different ones before finally choosing RNS Camelia.
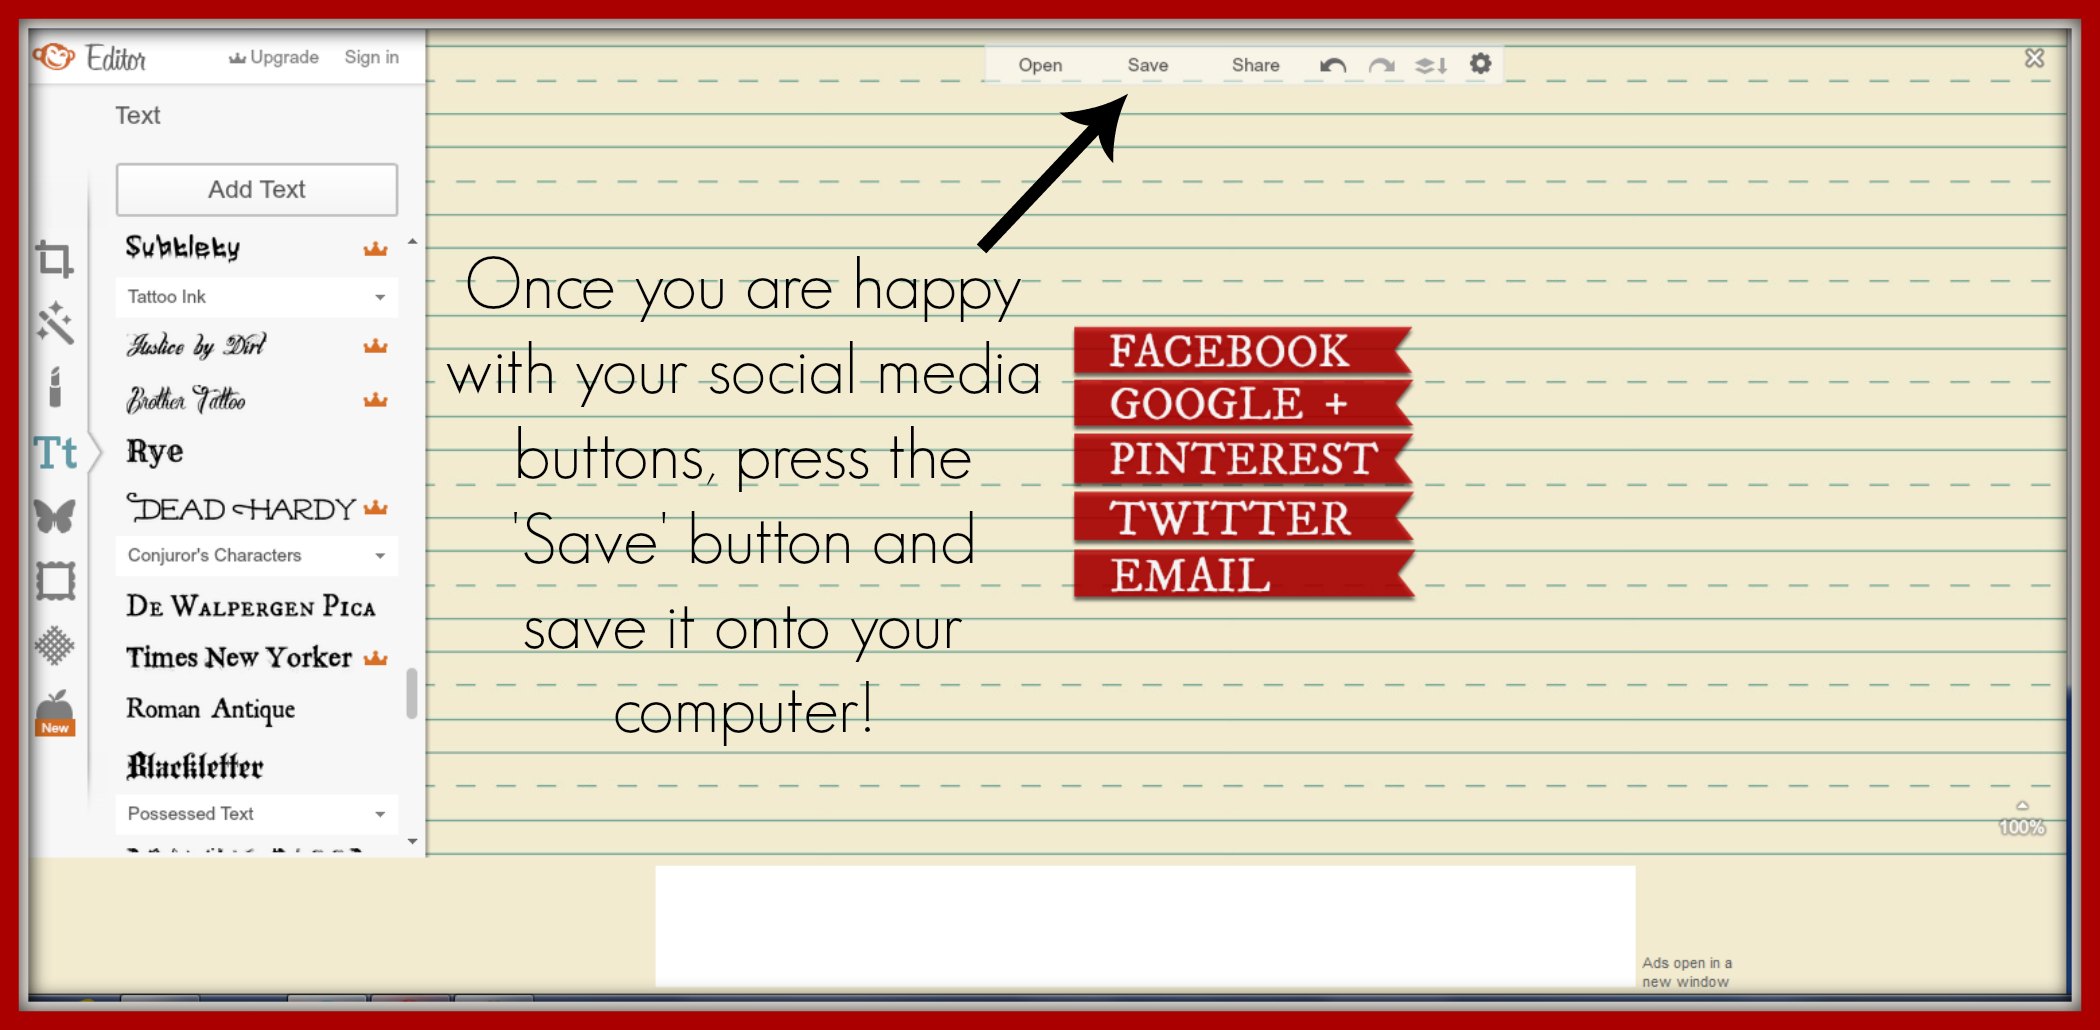
Once you are happy, save your social media buttons onto your computer.

Ta-Da!! Here is what mine looks like!
Step 2:
For this step we are going to use a fantastic *FREE* site to map our images. We have our cute social media icons, now we need to ‘map’ them so that when someone clicks onto it, it will bring them to the location you want; ie: your facebook page….your pinterest page….etc!
Go to Image-Maps in your web browser. I have made it easy for you and added the link…..just click on the word image maps above. This is what you will see:
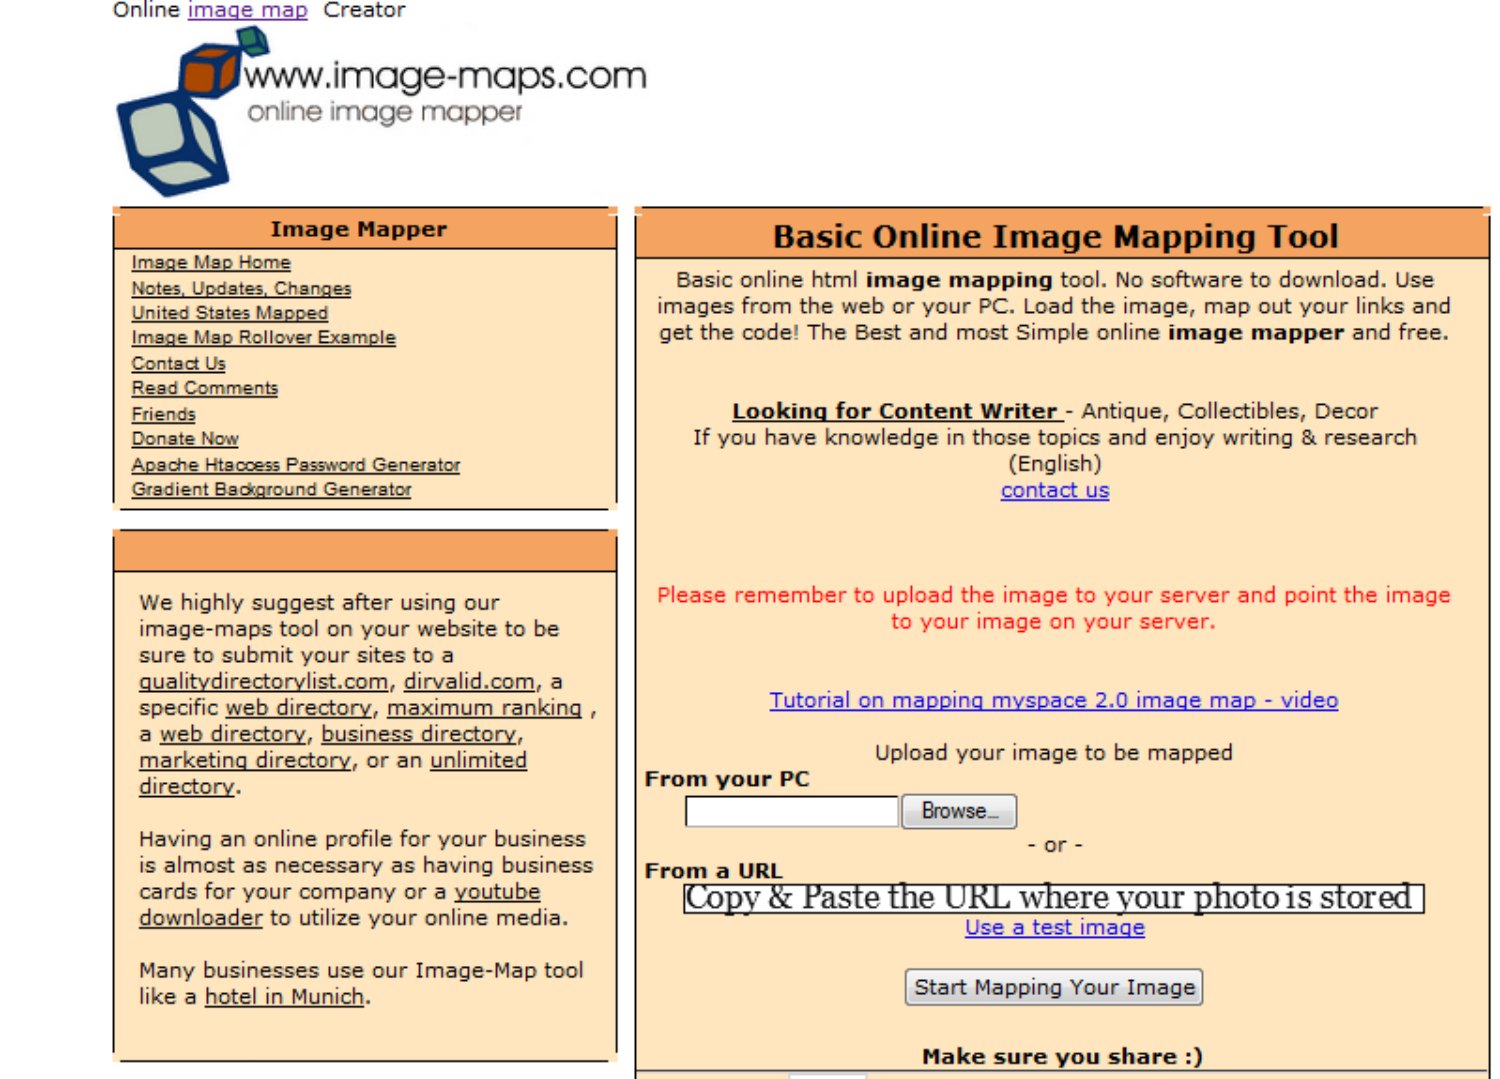
You are going to upload your photo. If you have your photo saved to a storage site like ‘Photobucket’, or something similar, then you will need to add it to the URL. For mine, I just uploaded it from my computer. Click onto the ‘Start Mapping Your Image’ button.
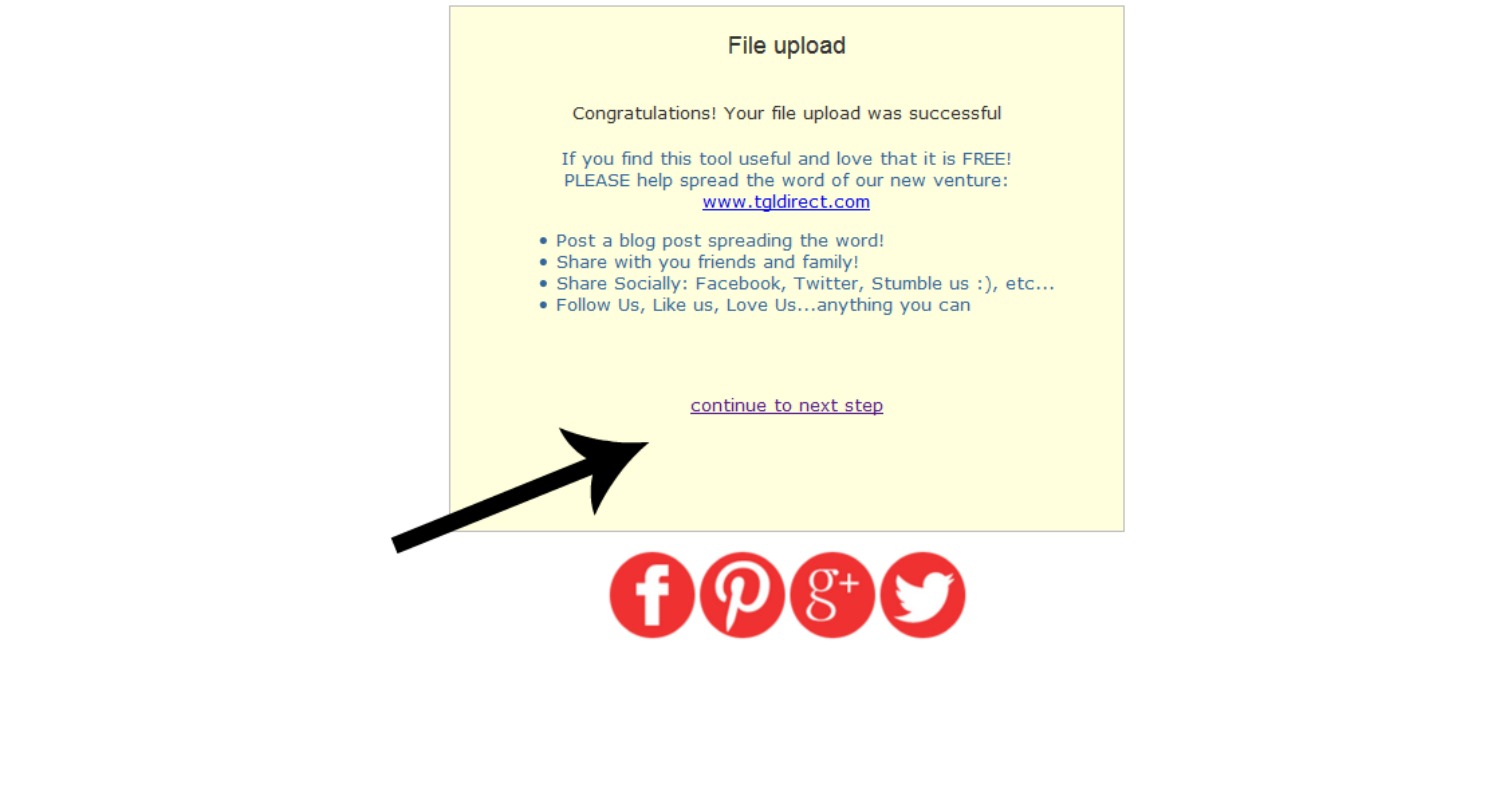
Why do the icons look different? Didn’t we just make them into banners? Yes, and yes……. but when I first had the idea to do a post on Mapping Images, I used the social media buttons you see above. The same principles and steps apply no matter what the icons look like, so why make more work for myself, right? I see you shaking your head, agreeing with me!! Plus, you are getting ALL the steps for creating Social Media Icons in one post, versus the 2 that I had originally planned on months ago. So really, you should be thanking me! I didn’t make you wait for this step. LOL! Once you see you image at the bottom of the screen, click ‘continue to next step’.
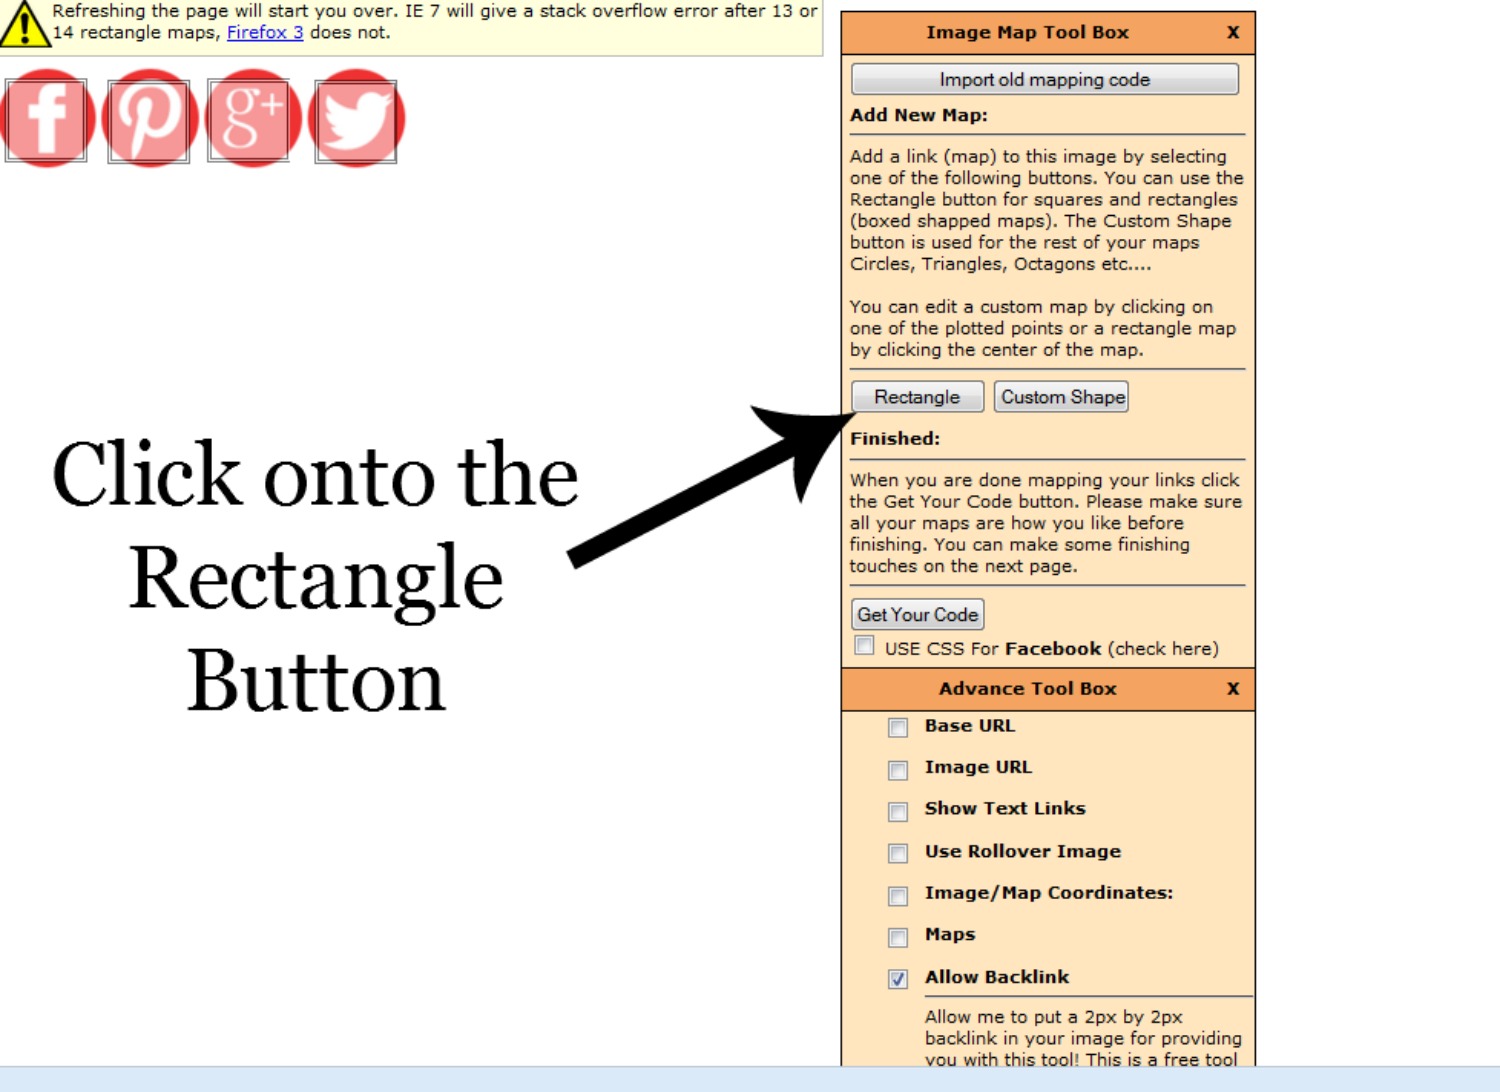
Click onto the Rectangle Button. I tried using the Custom Shape for the circles, but preferred the rectangle. Much easier, and when I am technically challenged….I need easy!
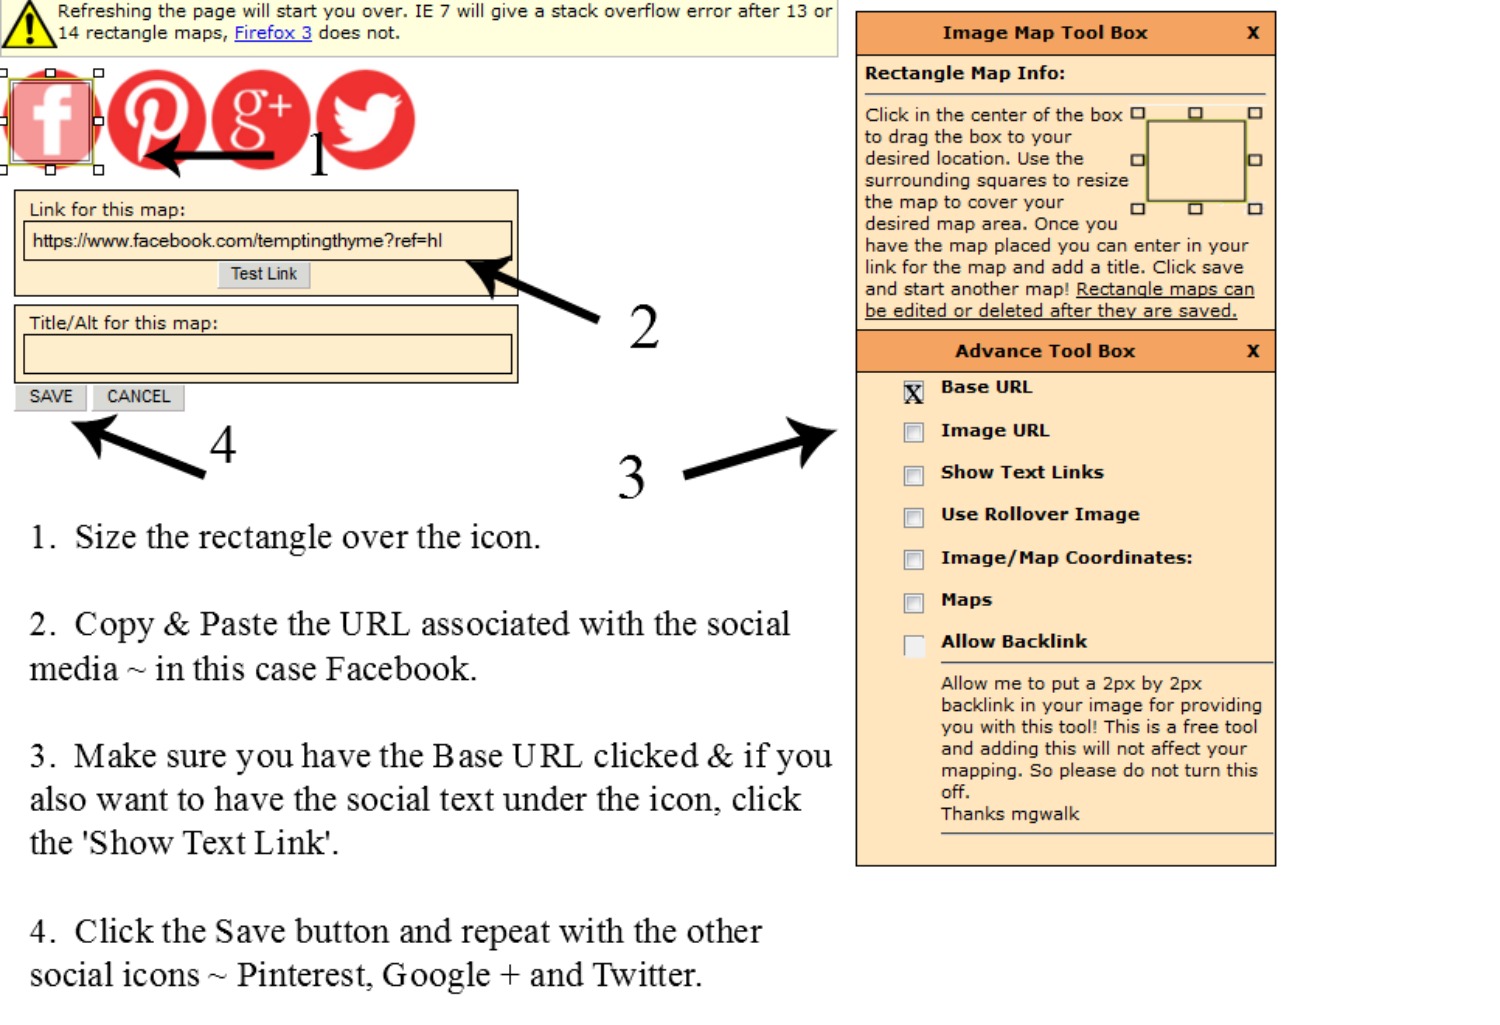
Follow the simple steps in the above image……
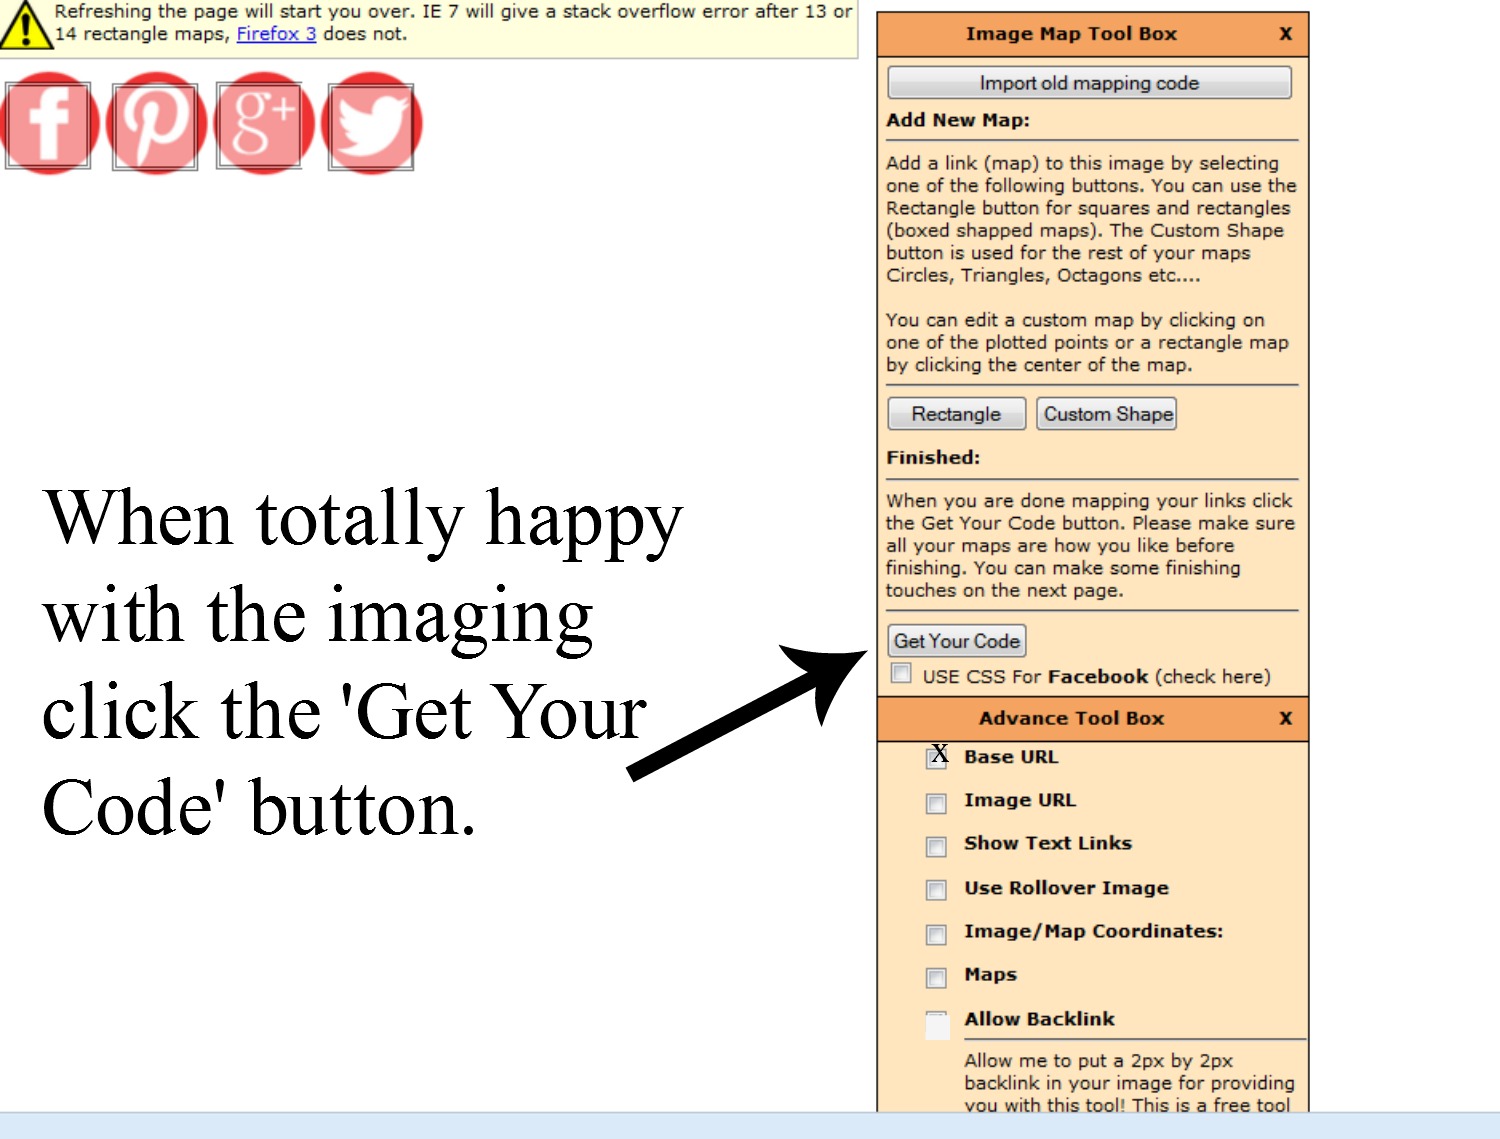
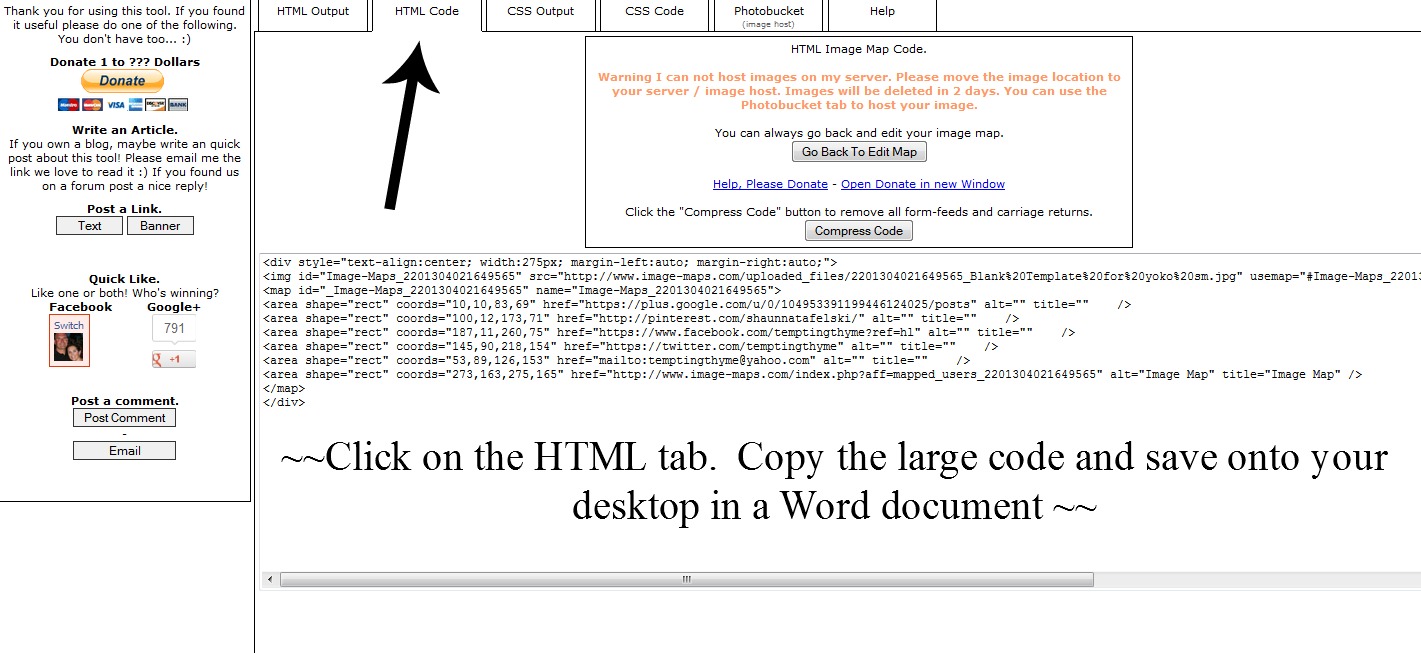
Now this screen is truly grainy! Sorry! Click onto the HTML tab at the top and you will see this really long code. This is the code that you will upload into your blog Admin panel. I always open a new Word document for each ‘code’, and label it accordingly. This is the only way for me to keep them straight, and allows me to revert to an old one at any time. Highlight this code, right-click your mouse and choose ‘copy’. Then go to your new Word document, right-click again and hit ‘paste’. Your code will appear and you should save it onto your computer.
Each blogging platform is different, so I can only tell you how to get it onto WordPress. In the WordPress Admin panel, go to Appearance—–> Widgets. You will choose the ‘text’ widget and drag it to your Sidebar. Once it is open, you will then go to your Word document and repeat the process of highlighting the code, right-click to copy and then paste it into that text widget. Don’t forget to click save once the code is in the widget. It is as easy as that!!
I hope you found Creating Social Media Icons helpful. I have used both of the sites {Picmonkey and Image-Maps} countless times, playing around and trying out new things. This is what happens when I am trying to avoid anything called ‘Housework’!! LOL! I will be adding in some more DIY Design posts for blogging shortly.
Until next time……
Shaunna
Looking for some great recipes? Check out some of my favorites….
Curvy Carrot Juice
Andretti’s Banana Bread
Carrot and Zucchini Muffins
Alice Springs Chicken

Wow, wonderful blog layout! How long have you been blogging for? you make blogging look easy. The overall look of your site is magnificent, as well as the content!
Oh My, THANK YOU Shauna… AGAIN!!! This is a fantastic how to!! I have been wondering for a while who on earth you would ever create your own icons lol. That was in the too hard basket, now it’s on the To-Do list 🙂 Totally loving your blogs about blogging, keep them coming…now I’m off to find more- you have distracted me from making my watermarks 😉
Gretta recently posted…Welcome
Thanks Gretta! I spent the first year of blogging trying to figure out rudimentary graphic design to “decorate” my blog, so that it would look nice without all of $$$ associated with it. I am thinking about doing an entire revamp of my site…..which means I can take screen shots of what I am doing and create new posts to help people like you and me!!
I cannot express how grateful I am for this post! I knew there had to be a way for a simple ol me to do this….THANK YOU,
Thank you for the kind words Anna!
Finally go time to sit down and do this. After over an hour of frustration, but success making my image then creating the mapping, I learn that I have to pay $6.99 per month for use of the mapped image??? So disappointed.
I was so bummed to hear this news, but not surprised. I just headed over to Image Maps, and I still see the donate tab, but not anywhere that says there is a monthly fee. I do see where you can create an account to save your images with them; maybe that is where the monthly fee comes into play. I didn’t save my final image with them. There are many online sites you can save it to that don’t charge any fees. Just save it to your computer and then upload it to one of these sites so that you have an official url to grab. I happened to upload it to my blog site in a post that is in ‘draft’ form.
It says that if I don’t have them host it (pay monthly fee) then it will be deleted in about 24 hours. That explains why others are seeing theirs disappear. I don’t know how to move it to a hosted site because the mapping doesn’t move with it? I’ve sent them a question about this…we will see what they say.
Anna the Chicken Lady recently posted…Oh Amazon, how I love thee… (New Kindle Unlimited Explained)
I heard back from them…great news! Please share this with those of us who are having issues. You need to host you own image, and you do this super easy by taking the image URL out of the mapping HTML. Upload that to an image hosting service, (photobucket is who I use). Then capture the new image URL from photobucket) and insert it into the place where the mapping image URL was.
Anna the Chicken Lady recently posted…You Know Why Women Were Born With the Ability to Have Multiple Orgasms?
Hi Anna, sorry for the delay! I added my code to a ‘text’ widget on my WordPress blog. This worked great for me. For other items on my sidebar (like the About image), I use my blog to “host” the image. I have used photobucket in the past, but the images disappeared when the image was getting too much traffic, and I wasn’t willing to pay their fee. Now I just open a new post, and upload my images to it. When I do this it gives each individual photo its own url. I don’t know if other blogging platforms allow this or not, but it does work on WordPress. BTW….I never publish these posts, it always stays in draft form.
That’s a great idea Shaunna, I totally forgot about that. And yes, blogger does that too. I’m gonna do that. Photobucket is good for playing with images, but not so good at hosting them.
Anna the Chicken Lady recently posted…The # 1 Spice I Use In Just About Everything I Cook…
Did it…it works!
So glad! Will be heading over to check it out!!
Amazeballs! Exactly what I need for my blog redesign! Thank you!
I have used this mapping before and is what currently shows my socials buttons on my blog now. But now I want to change and add a button but when I go to this mapping site, it has changed and im confused now. It looks nothing like it did in October 2013. uuugh
Lisa recently posted…Happy New Year!
This is a great post. i did this and a few days later, my icons disappeared off my blog. A blank rectangle is left with a ? in the middle? Have you heard of this happening before and if so any tips on how to fix it?
Are you hosting your images on another site, such as photobucket? I had this happen to my entire sidebar of photos a few weeks ago. I guess I had maxed out the bandwidth for their ‘free’ service, and they were holding my photos hostage until I subscribed to their premium service. If you host your photos elsewhere they could be having some issues with their server. If you used image-maps; no I have never heard of it. Did you save your html code in a Word document? If you did, you can quickly reenter it into the sidebar. Let me know how it turns out!
I am wondering about this too. I have had it happen. And am trying to fix it.
I have loaded and reloaded my code several times, and it will be there for a day or two and then disappear. It isn’t my photo storage either because I pay for that too.
This exact same thing is happening to me. I have reloaded my icons several times. Let me know if you find a solution.
Now it is happening to me! I will look into it, and if anyone finds a solution first, please let us all know. I reloaded mine numerous times as well to no avail. My only thought is that Image Maps had issues with their site, OR they switched hosting companies, which could cause issues. I might spend some time and redo the mapping (as I have the image saved to my computer), and see if it works then. Stay tuned…..
This was a really helpful post. I used it today to make some buttons, and now I am trying to decide which ones I like best and want to use. I pinned, G+-ed, tweeted & FB’d. Just popping over from the Strut your stuff Saturday link party. I’ve pinned, liked, twittered and G+-ed your post. I’d love it if you dropped by for a visit at http://www.kneadedcreations.com . I look forward to seeing you over there! Deb @ Kneaded Creations.
I am so glad you found it helpful/useful! I have had a hard time also creating so many different buttons and icons and then figuring out which ones to use. Swap them out every week if you feel like it!!!
Reblogged this on larnthegeekstar.
PINNED for future use. Thanks for the great tute. Linda