
Woo Hoo!!
I finally finished a new project and can’t wait to show you all!
I love Subway Art….have adored it since living in my beloved New York City. Love the different elements that can be added, as well as the different textures and mediums you can use. I am also gaga over Words and Quotes, and love to surround myself with inspiration. Whenever I am in a foul mood, or feeling sorry for myself, reading these quotes give me the swift kick in the ass butt that I need. But holy bejesus…it can be EXPENSIVE!
Last week I found an amazing tutorial, that showed me how I can turn all of my desires….OOPS….think decorating folks….GEEZ, get your head out of the gutter…HA! Anyway, I am not going to give you a step by step on this wonderful project. Just go here and she tells you everything you need to know.
What I will give you are my thoughts and tips on creating your very own SUBWAY ART!
HEY…did I forget to tell you that I was able to make 3 works of art for only $6.50 each. You heard it, JUST $6.50!!
First Step: I created my jpeg file on a website called Picnik. Warning, warning….this site is closing in the middle of April….but, I am already scouting out a few other’s for future use. Let me take a moment and weep a little!
Why oh why didn’t I learn of this site earlier?
It is totally AWESOME, and right now everything is FREE…even the premium stuff! Did you notice that my recent pictures say www.temptingthyme.com? Courtesy of Picnik!! I uploaded a high resolution 4×6 to work with, blacked it out with the rectangle and added in the text. I then saved it back onto my computer as a copy. I took the photo, on a flashdrive, to my local Staples. How much did I pay for the Engineering copy…a whopping $2.99!! The only glitch was that I asked for a 2’x3′ copy, but received a 16″x23″ print. They advised doing the text on an 81/2 x 11 sheet, not a 4×6. Will have to play around with that.
Second Step: I raced to my favorite hardware store…Lowe’s…to get the necessary plywood and pine slats. Now that I have a few under my belt I will be choosy about the width of the lumber that I purchase. I purchased birch plywood and 1×2 inch pine slats. I will look for thinner boards next time, possibly a 3/8 inch thickness. I measured out my 3 printed copies and had Lowe’s cut the plywood down to size for me. I figured I could cut down the slats at home. MISTAKE!
I forgot that I had a lousy miter box/saw versus the Reciprocating/Compound Miter Saw that I drool over!! Why won’t PT listen to me when I request one for birthdays and Chrsitmas? Where is my TOOL FAIRY that will just drop one off at my doorstep? Craftsman, DeWalt…I am not choosy (but it must have a 12″ blade..lol)!!
 Can you believe I cut 12 of the pine slats using this stinking miter box? Actually, let me rephrase…I cut 11 and then asked PT to cut the last one. I did this for 2 reasons. I wanted a good laugh, AND I was hoping he would see reason and RUN out and buy me a brand new spanking saw! No such luck. This is me still crying. =)

I created a “frame” on the back of the plywood and nailed the slats into it. I did this for all 3, but next time I will try something different and create my frame first (vertical not horizontal), and then lay the plywood on top of the frame. It will create the depth I desire, but also allow me to buy thinner wood. 
If you hadn’t noticed I painted all the wood black (the corner section above still needed some love), and then sanded it down.
Third Step: I used 2 different techniques to get the paper onto the boards. For the boys’ I used Mod Podge, but for the quote I wanted a smoother top so I used a spray adhesive from Tree House Studio. Tip:Pay close attention to the sides and corners-make sure you have a tight seal. I used one of the Pampered Chef stoneware cleaners as my ‘tool’ to seal the paper and to work out any bubbles.
I didn’t have B’s lined up properly and it ended up cock-eyed on the board. No way I could make it look decent, so once it dried I sanded the entire area…take a look below, I think it looks kind of cool. But the picture is all I have of this “art”, as I got my act together and redid B’s and used this same board. I left a little of the paper overhang the wood frame. Once dry, I sanded down the edges and the thin paper came right off.

I love distressed and weathered wood, so I sanded the sides some more and then very gently sanded the tops of the paper. I was very nervous to do this, thinking that the paper would tear. They each turned out a little differently. 
I am so thankful that I happened across this tutorial. I truly think it has changed my life…given me a new avenue to change my ‘inspiration’ pieces WITHOUT breaking the bank.

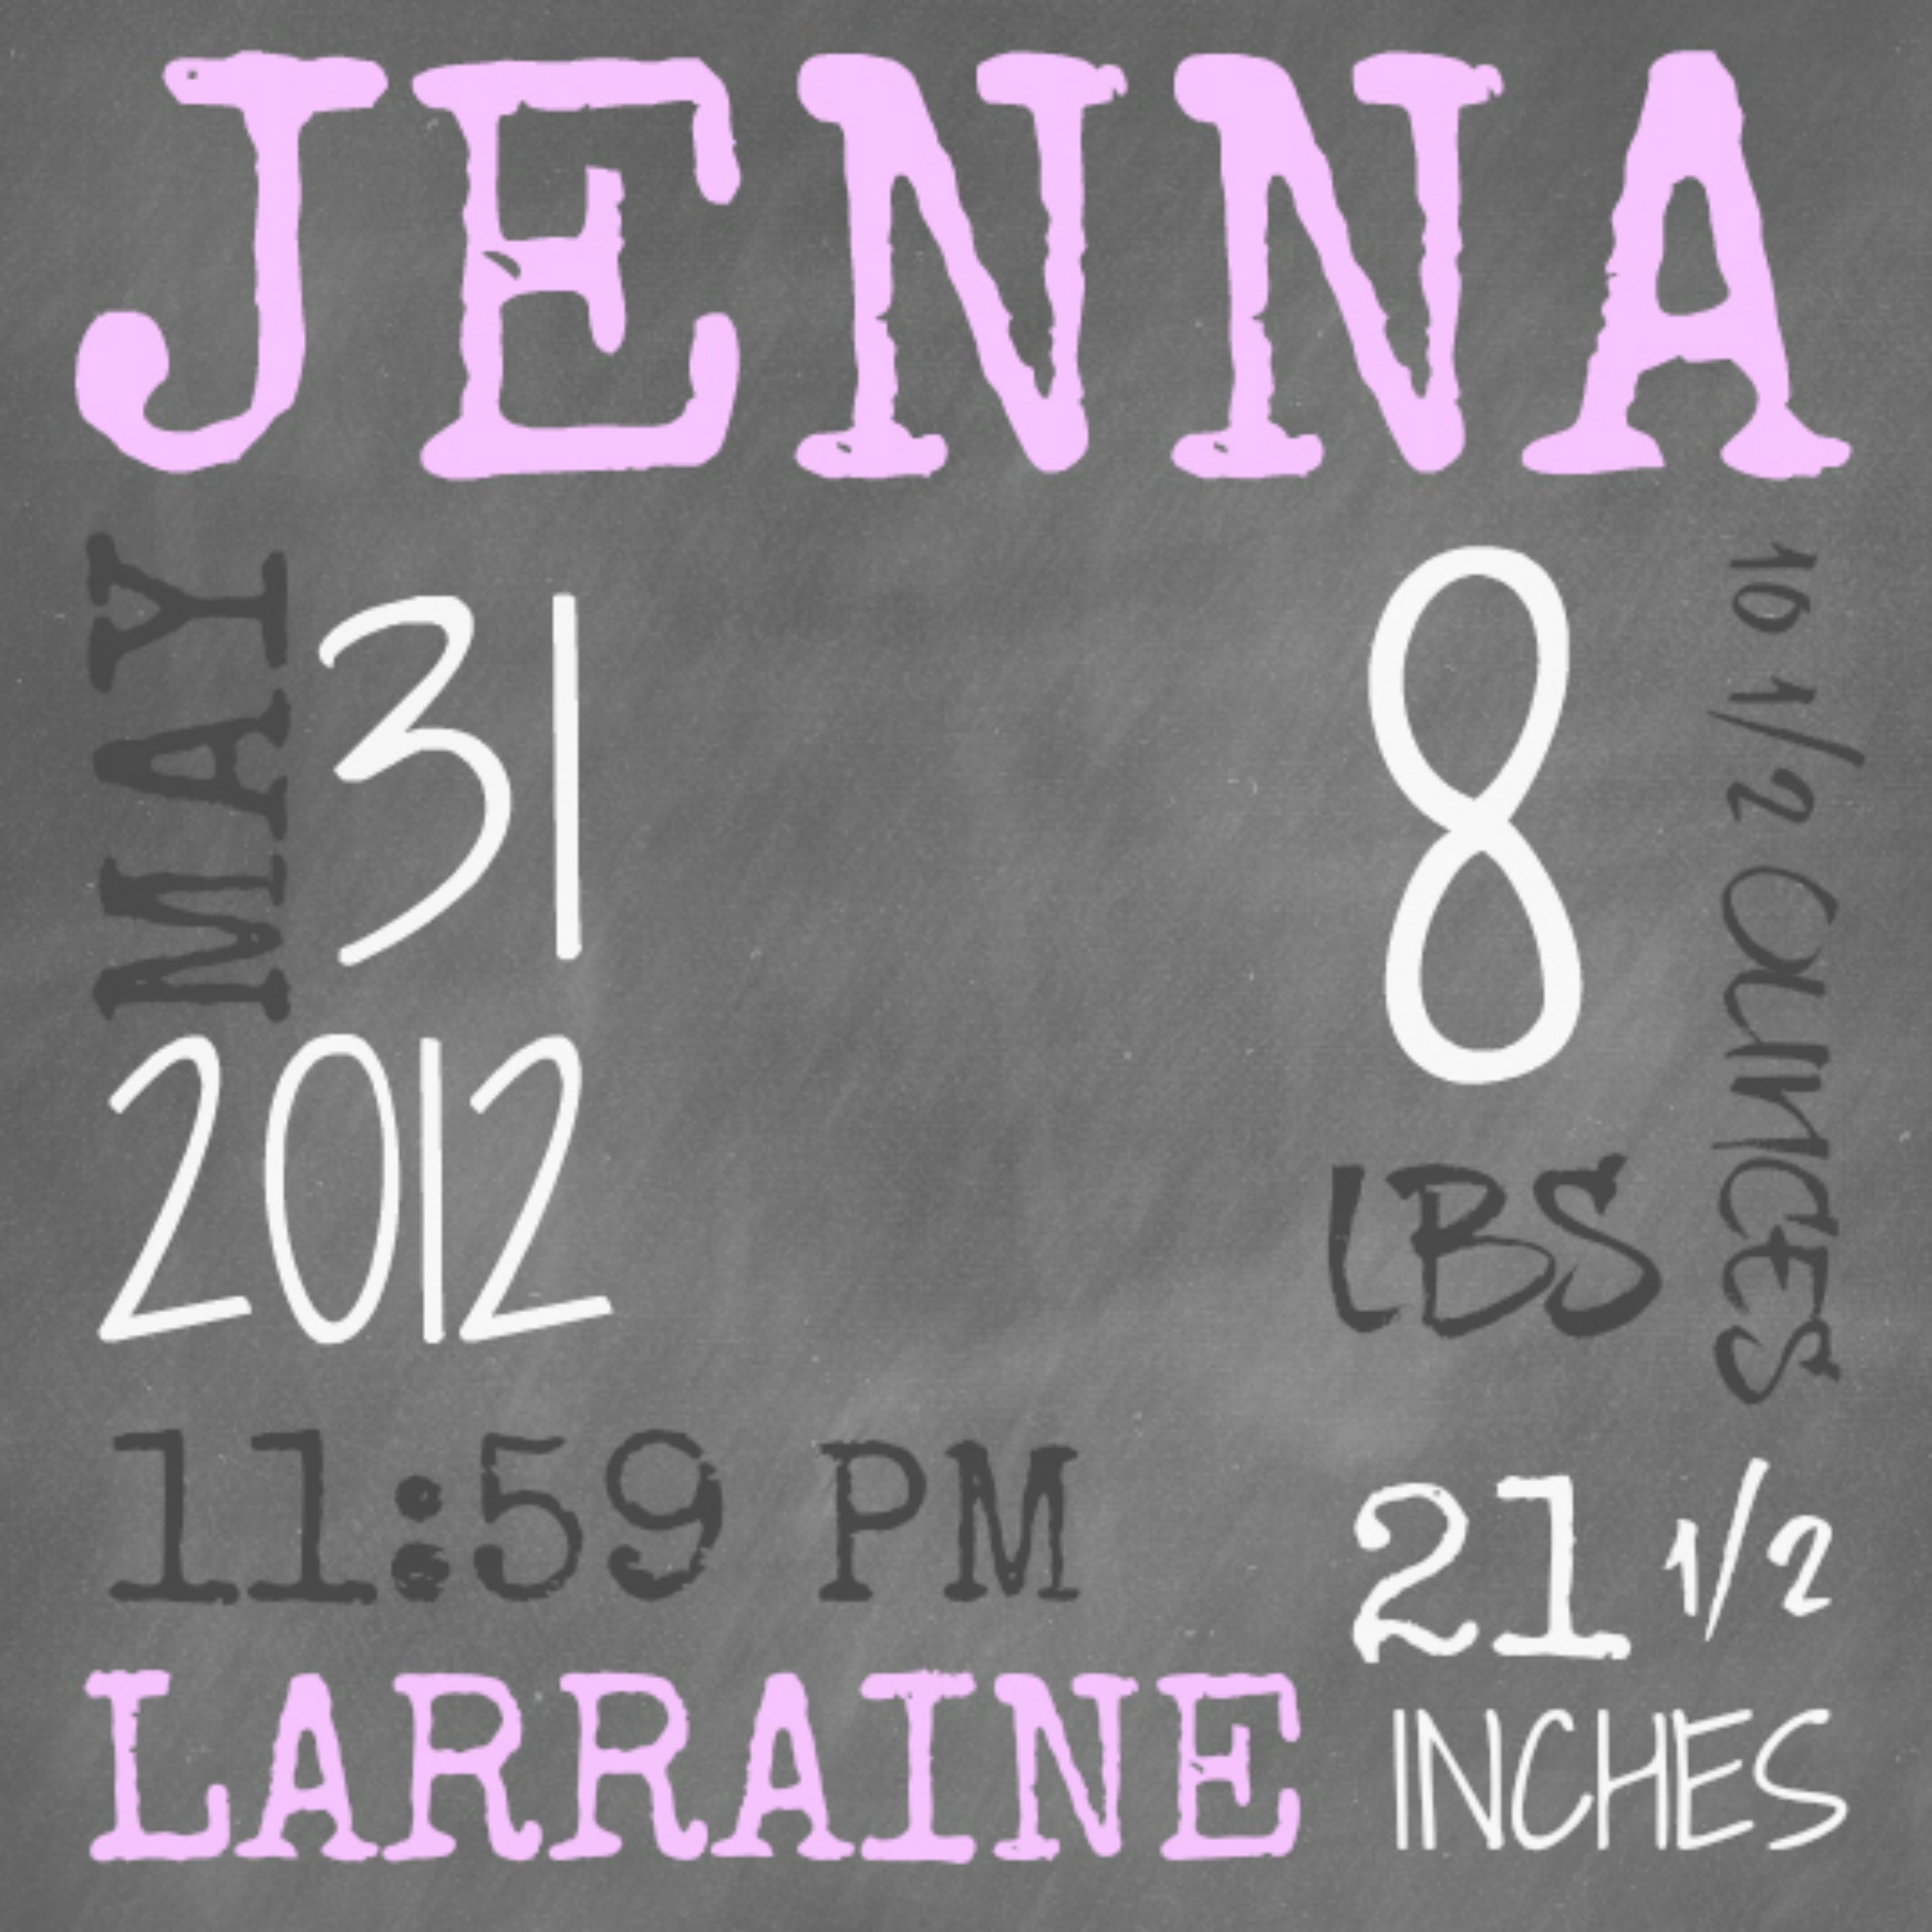
This board is 10 1/2 x 16 inches. I chose to do one vertical and the other horizontal. 
And finally….

I am still in awe over this project. The options and possibilities are endless. I think this summer I am going to have to drag out my Cricut and try doing larger boards using a ‘reverse’ technique. Vinyl lettering on the board, paint over everything and then peel the letters up. Hmmm…I have a very large foyer wall that needs some attention.
Materials used to make Subway Art:
1. Birch plywood slab-bought at Lowe’s, they will cut it down to size. Measure your picture TWICE!
2. 1×2″ pine craft slats
3. Black paint- already had this on hand.
4. Sandpaper- already had this on hand.
5. Mod Podge- I prefer the Matte-bought at Hobby Lobby.
6. Tree House Studio Spray Adhesive-bought at Hobby Lobby.
7. Engineering Blueprint Copy from my jpeg file-Staples.
Tell me what you think…..
Subway art is like giving your walls a personality—bold, expressive, and completely you! 🎨🖌️ By combining typefaces, colors, and creativity, you may create a masterpiece that reflects your unique style. DIY magic at its best—go make something amazing! 🚀✨
I am presently working on teachers retirement gifts. I have created a subway art document in Word using WordArt boxes. (Now that I have the template it is easy to change words and clip art for other people.) You have really solved many of my questions as what to do with them. At first I was going to frame but I like your idea. Question…Do you know if the same method would work on canvas?
Also…what did you have the jpeg printed on…glossy photo paper or just laser copied onto white paper?
I have placed the engineering copies on both the wood frames and canvas. I prefer the wood, but the canvas projects turned out great….just a little harder to work with as the canvas backing is flexible. Just make sure you put a book under the canvas when you are working out all the bubbles and smoothing the print. If you don’t the canvas will “push” down while you are working with it. The book will give you that flat surface that you need. Most of the subway art that I do is on the large engineering prints (2’x3′ to 2’x4′), but when I do the smaller projects then I just use regular printer paper. I like to sand my projects down a little, and I wouldn’t be able to do that with the glossy paper. Let me know if I didn’t answer your questions, and I would love to see pictures when you are done! Good Luck!!
Dumb question, but did you print it black with white letters? Trying to figure it out.
Shell recently posted…On Reading to Babies (or It’s Never too Early)
Sorry for the delay. Yes, it is black with white letters. I have done the reverse for one I did for my oldest when he graduated from high school.
What kind of expense is the board/frame system that you use and where did you get your pine slats? Lowe’s also?
You can get 8 ft pine slat at Lowe’s for about $2, and the birch plywood was also purchased at Lowe’s for about $4. They have all different sizes, so yours may cost a little more depending on the size of your engineering print.
Thanks so much! 🙂
I am presently working on teachers retirement gifts. I have created a subway art document in Word using WordArt boxes. (Now that I have the template it is easy to change words and clip art for other people.) You have really solved many of my questions as what to do with them. At first I was going to frame but I like your idea. Question…Do you know if the same method would work on canvas?
2 questions:
1) Do you put down the midge podge and then sand it?
2) What sandpaper did you use?
Great project
Put the mod podge down first, lay your paper down and smooth it out. After it has dried you will lightly sand it with 120 or 160 grit sandpaper. Thank you for asking….good luck!
Hi. I was wondering if you put anything on top of the paper after you glue it to the board to protect it. Do you put the Mod Podge on top and then when it’s dry sand it down? Or do you sand the paper first, and put Mod Podge on it?
Hi Nancy, If I use Mod Podge as the bonding agent I don’t put anything on top of the finished product to seal it. If I use a spray adhesive, such as Treehouse Studio, to bond it, then I will occasionally put Mod Podge over the top AFTER I lightly sand it. I have also used a Spray Matte sealant over the top as well.
I think you are truly amazing!!! I LOVE this idea!! The way you made them personal for the boys is so wonderful!!
Thanks Mary! I have done another one with ‘rules of our house’…just don’t have it on a board yet. I plan on making these as baby gifts with the name, birthweight, etc and then personalize it with odds and ends. I am thinking a 12×12 will be the best size for this, and I won’t be able to use b&w, but I would have loved to get one for my kids when they were borne.
A cool blog post there mate ! Thank you for posting .
Beautiful!!! I’m so impressed…..and so checking out this tutorial!! Thanks, Shaunna!
Jen- It is so easy, makes you want to log onto Picnik and start one doesn’t it? You can even make it easier and put it in a picture frame…doesn’t have to be laid out on wood!